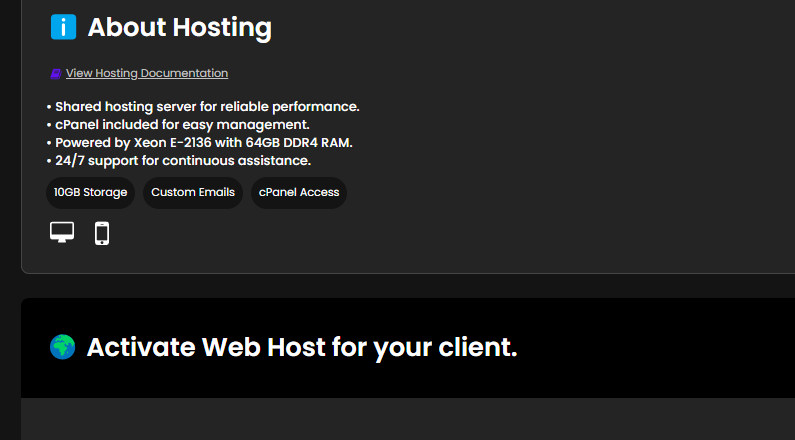
Web Hosting
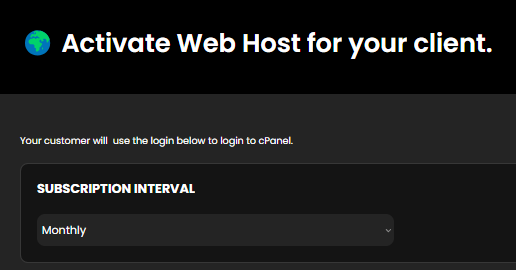
To activate the Web Hosting for a company:
- Navigate to the Marketplace and select "Web Hosting".
- Select a time period such as Monthly.
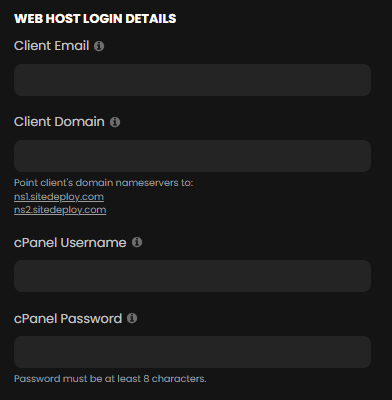
- Input the client's existing domain. If you don't already have one, purchase it before creating a hosting account. Point the domain to nameservers ns1.chams.llc and ns2.chams.llc.
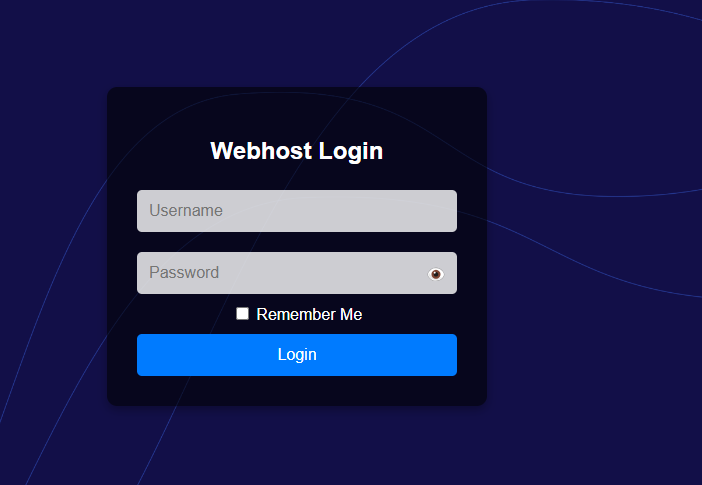
- Input the desired client username and password. The client will be able to login to the cPanel at this link.
Web Hosting Features:
- User-Friendly Interface
- One-Click App Installations
- Comprehensive Email Management
- Integrated Security Tools
- Easy File Management
- Database Management with phpMyAdmin
- Automated Backups
- Real-Time Resource Monitoring
- Advanced Security Features
- Task Automation with Cron Jobs
- Getting Started
- About Emails & Files Management
- About FTP Connections
- About Databases
- About Domains
- About WP ToolKit
- About Cron jobs
Getting Started
Welcome to the ResellPortal.com reseller system! This guide will walk you through the process of purchasing and deploying web hosting packages for your clients.
1. Account Setup
-
Sign up or log in to your account at ResellPortal.com.
-
Ensure you have sufficient balance to purchase web hosting packages.
-
If needed, top up your balance using the available payment methods.
2. Purchasing a Web Hosting Package
-
Navigate to the Activate(Manual) section on the dashboard.
-
Select the web host app.

-
Click on the Deploy app button.
-
Confirm the purchase, ensuring you have enough balance in your account.

3. Deploying the Web Hosting Package
-
After Deploying the App.
-
The system will take you to the activation page.

4. Activating the Web Host for a Client
-
On the activation page, select the Subscription Interval:
-
Monthly
-
Quarterly
-
Biannually
-
Annually

-
-
Enter the Client's Web Hosting Login Details:
-
Client Email
-
Client Domain
-
cPanel Username
-
cPanel Password

-
-
Instruct your client to update their domain's nameservers to point to:
-
ns1.sitedeploy.com
-
ns2.sitedeploy.com
-
How to Point a Domain to the Correct Nameservers
If your client is unsure how to point their domain to the correct nameservers, provide them with the following instructions:
-
Log in to Their Domain Registrar
-
This is the company where they purchased their domain name (e.g., Namecheap, GoDaddy, Google Domains, etc.).
-
-
Find the Domain Management Section
-
Once logged in, navigate to the domain management area or DNS settings.
-
-
Locate the Nameservers Settings
-
In the DNS or Nameserver settings, they should see an option to edit or change the nameservers.
-
-
Update the Nameservers
-
Replace the existing nameservers with:
-
ns1.sitedeploy.com
-
ns2.sitedeploy.com
-
-
-
Save Changes
-
After entering the new nameservers, they should save the changes.
-
-
Wait for Propagation
-
It can take anywhere from a few minutes to 24-48 hours for the domain changes to fully propagate across the internet.
-
-
Click Activate to complete the process.
5. Managing Active Web Hosting Accounts
-
View active client subscriptions in the Dashboard.
-
Renew, upgrade, or manage existing hosting accounts as needed.
-
Notify clients about upcoming renewals to prevent service interruptions.
Troubleshooting
If you encounter any issues:
-
Ensure you have a sufficient account balance before purchasing.
-
Double-check the client's details before activating.
-
If activation fails, verify that the domain and cPanel credentials are correct.
-
For additional support, contact ResellPortal.com Support.
By following these steps, you can efficiently manage and sell web hosting packages to your clients. Happy reselling!
For further assistance, visit ResellPortal.com Support.
About Emails & Files Management
As a reseller, understanding how to use cPanel is essential for managing web hosting services for your clients. This guide will walk you through the necessary steps to help you navigate cPanel efficiently.
Accessing cPanel
Once you have activated a web hosting package for a client:
-
The client will receive an email containing their cPanel login link, username, and password.
-
Clients will use these credentials to log in to their cPanel interface.

As a reseller, you may also need to access cPanel for troubleshooting or assistance. You can do so from your reseller dashboard.
Navigating cPanel
Upon logging in, you will be directed to the web hosting control panel, where you can manage various tools and features.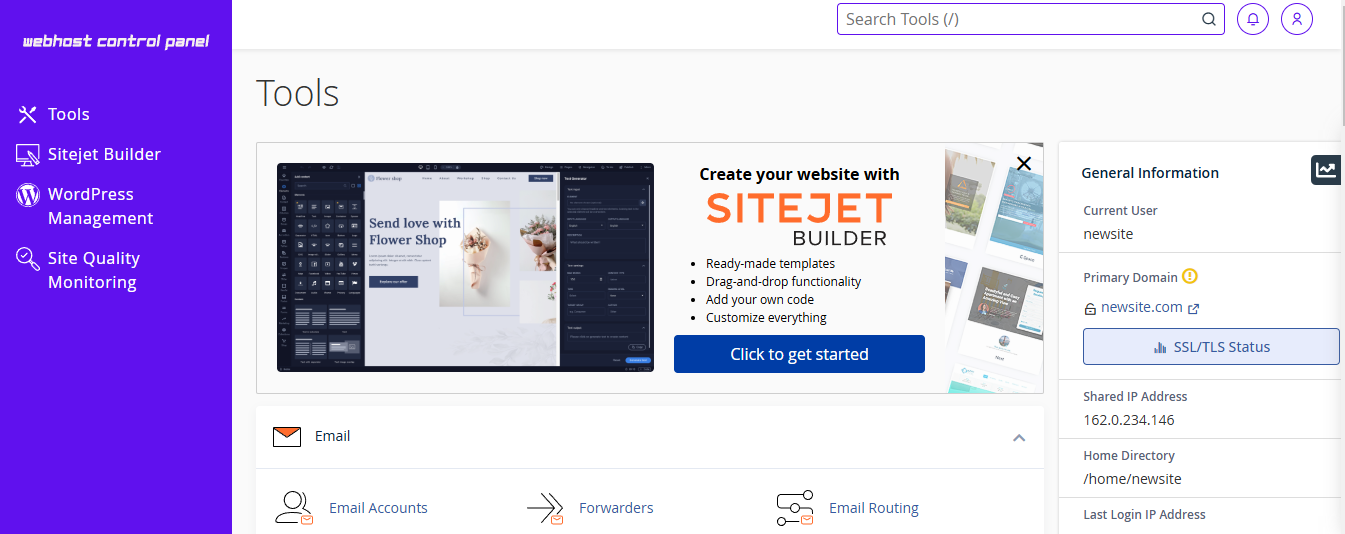
1. Managing Email Accounts
cPanel provides an Email Accounts feature, allowing users to create and manage custom email addresses linked to their domains.
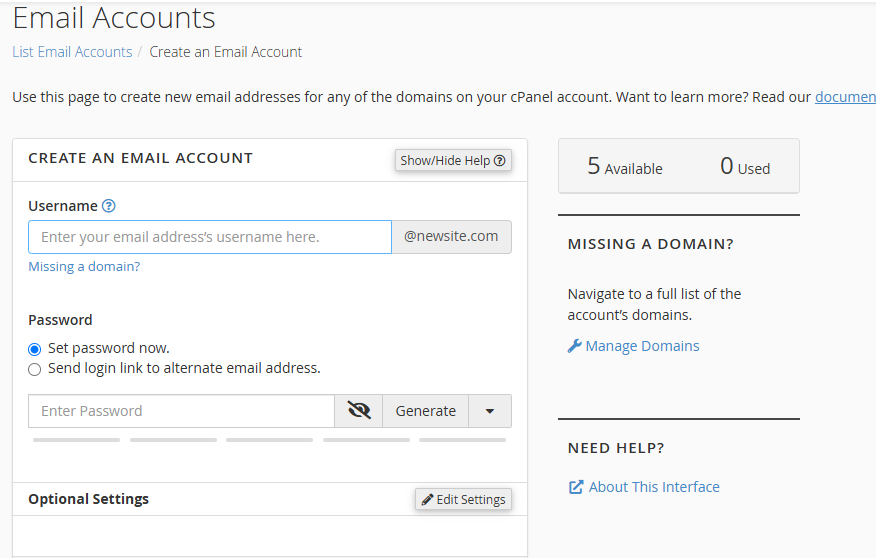
Creating an Email Account
-
Navigate to Email Accounts under the Email section.

-
Click the Create button.

-
Enter the desired username (e.g.,
username@domain.com). -
Set a password manually or generate one automatically.
-
Click Create to finalize the new email account.

-
The created email account will now appear in the Email Accounts list.
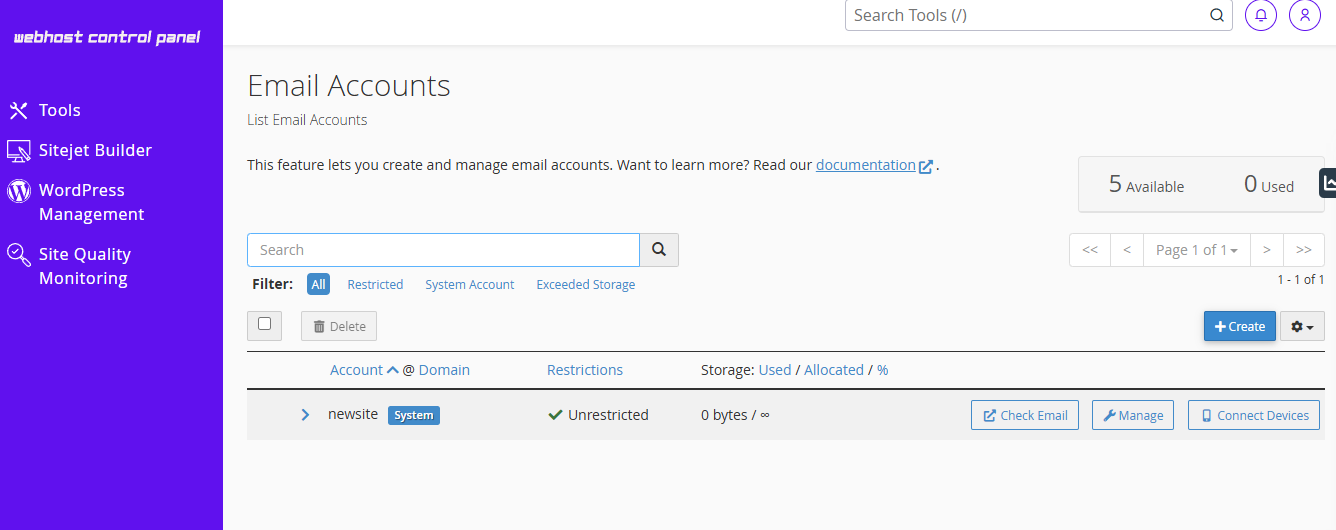
Managing Email Accounts
-
Users can filter the email accounts list by:
-
All
-
Restricted
-
System Account
-
Exceeded Storage
-
-
Users can search for specific email accounts.
-
Additional options include:
-
Connecting devices (to configure mail clients like Outlook or Thunderbird).
-
Managing storage.
-
Checking email directly from cPanel.

-
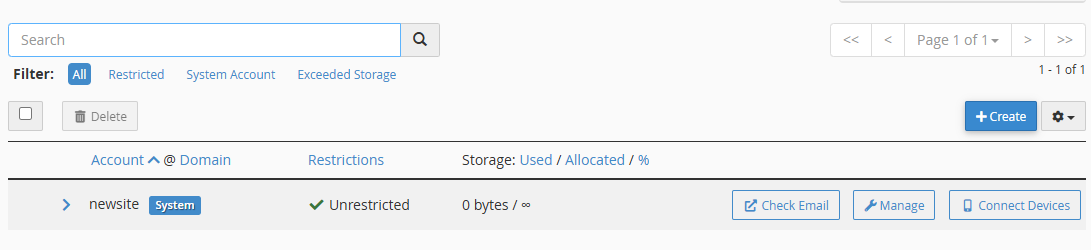
System Email Account
-
The system email account receives emails addressed to the cPanel username on the server’s hostname.
-
This account may also receive misrouted emails depending on the Default Address settings.
-
The username and password for this account are the same as the cPanel login.
-
This account cannot be deleted and has no storage quota.
2. Managing Files
cPanel includes powerful file management tools that allow users to upload, edit, and organize their website files efficiently.
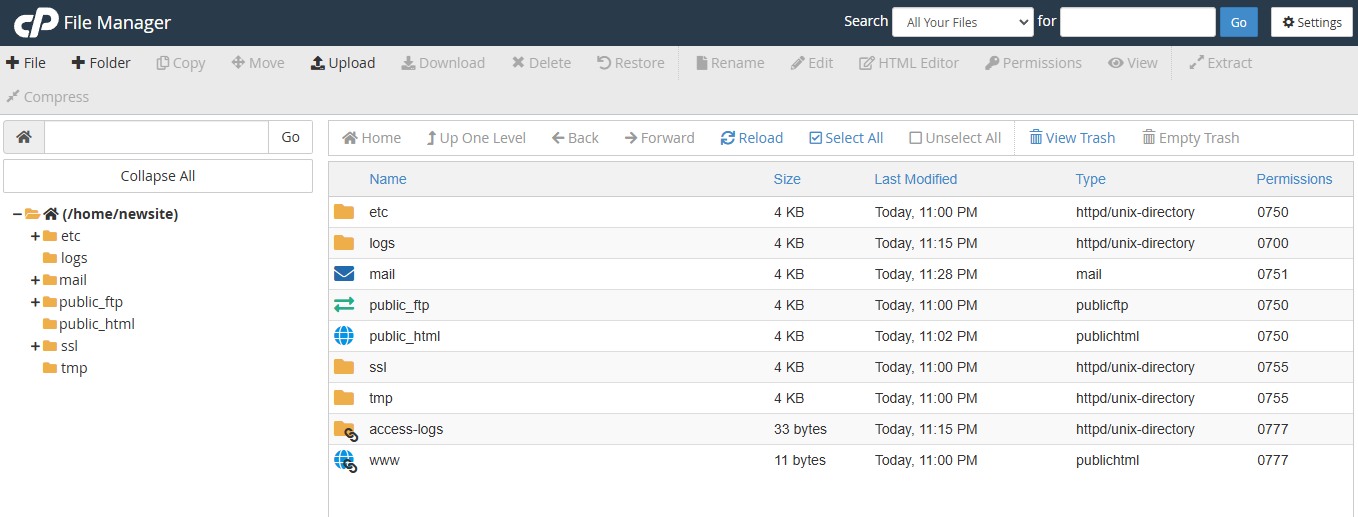
File Manager
The File Manager tool provides an easy-to-use web interface for managing website files.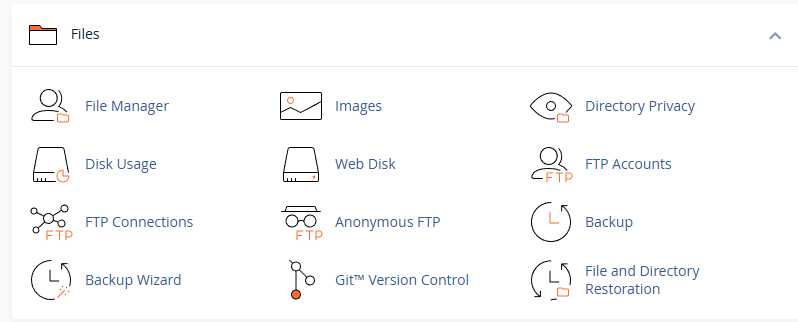
After selecting this feature:
-
The user is redirected to a File Manager topic where they can view and manage their files.
-
The File Manager displays essential details such as:
-
File Name
-
Size (in bytes)
-
Last Modified Date
-
Permissions
-
File Type
-
-
Users can perform the following actions:
-
Add a new file
-
Create a new folder
-
Upload files from their local computer
-
Edit, rename, move, copy, or delete files
-
Change file permissions

-
Backup & Restore Features
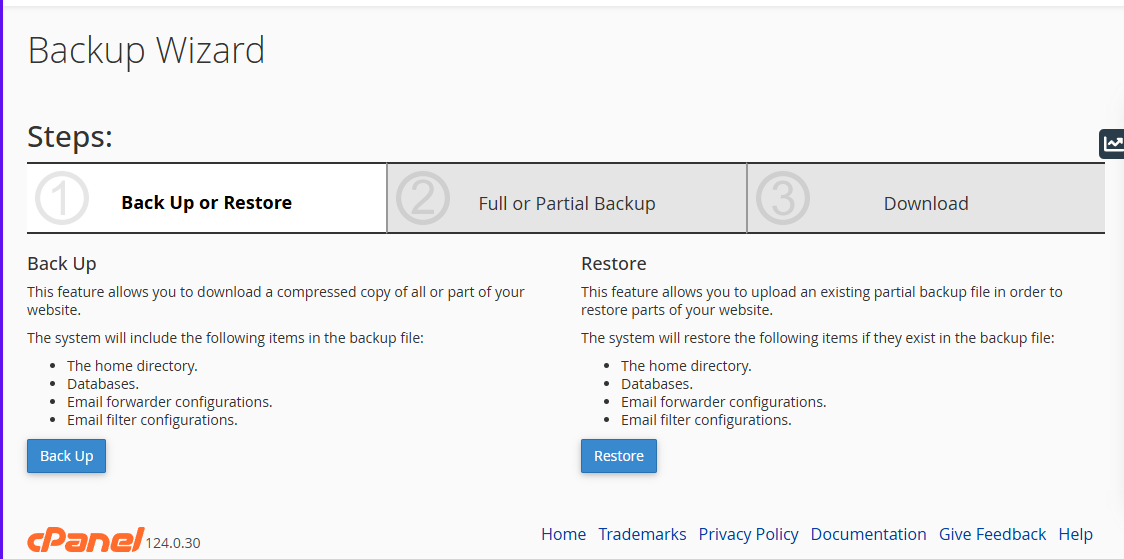
cPanel provides two primary backup tools: Backup Wizard and Backup.
Backup Wizard
The Backup Wizard allows users to download a compressed copy of all or parts of their website. The system includes the following items in the backup file:
-
Home Directory
-
Databases
-
Email Forwarder Configurations
-
Email Filter Configurations
Users can also restore backups, allowing them to upload an existing partial backup file to restore parts of their website. The system will restore the following items if they exist in the backup file:
-
Home Directory
-
Databases
-
Email Forwarder Configurations
-
Email Filter Configurations

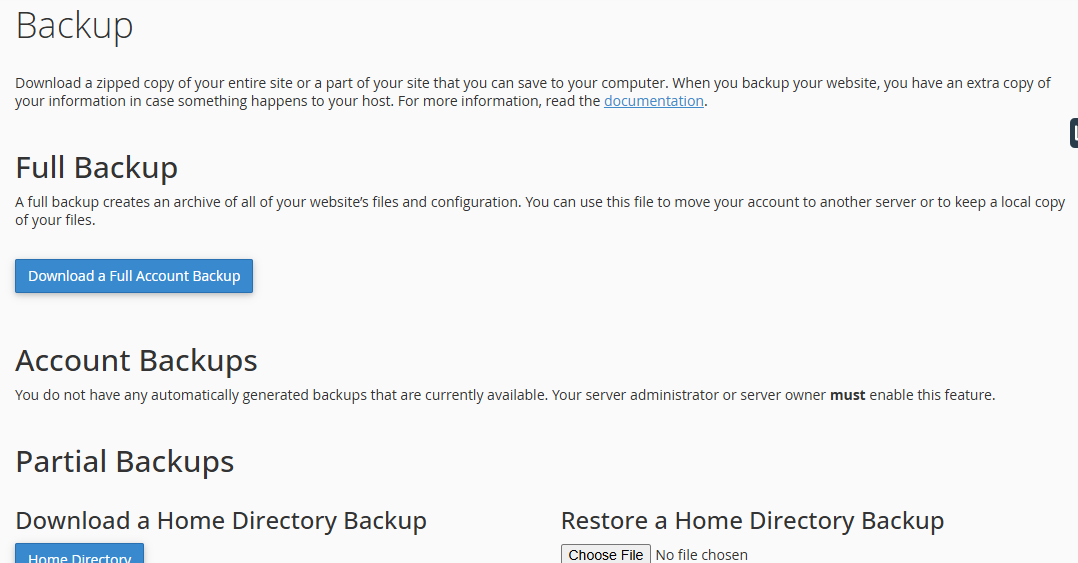
Backup Feature
The Backup tool enables users to download a zipped copy of their entire website or selected parts. This feature is useful for keeping an extra copy of website data in case of accidental loss or server issues. Users can perform:
-
Full Backups – A complete backup of their entire cPanel account, including website files, emails, and databases.
-
Partial Backups – Users can download only specific parts of their website.
-
Account Backups – Allows backing up account settings and configurations.
As a reseller, understanding cPanel functionality helps you provide better support to your clients. Ensuring that they can manage their emails, files, and backups efficiently is key to a seamless web hosting experience.
About FTP Connections
The FTP Connections feature in cPanel allows users to monitor and manage visitors logged into their website via File Transfer Protocol (FTP). This tool helps ensure security by providing visibility into active FTP sessions and the ability to terminate unauthorized connections.
Accessing the FTP Connections Tool
To monitor FTP activity:
-
Log in to cPanel using your credentials.
-
Navigate to the Files section.
-
Click on FTP Connections.


Understanding the FTP Connections Topic
The FTP Connections topic displays a list of users who are currently connected to your site via FTP. The information is presented in a table with the following columns:
-
User – The FTP username currently logged in.
-
Logged in From – The IP address of the user accessing the FTP account.
-
Login Time – The exact time when the user logged in.
-
Status – The current status of the FTP connection.
-
Process ID (PID) – A unique identifier for the active FTP session.
-
Actions – Options to terminate the connection if necessary.

How to Monitor FTP Sessions
-
Check Active FTP Users
-
The table will display all currently active FTP connections.
-
Look for unusual IP addresses or login times that may indicate unauthorized access.
-
-
Verify Login Information
-
Compare the logged-in User and IP address with known users who should have FTP access.
-
If an unknown user is logged in, it could be a security risk.
-
- Refresh the Session List: Click Reload to update the list of active sessions
Terminating Unwanted FTP Connections
If you identify an unauthorized or suspicious FTP session, follow these steps to terminate it:
-
Locate the session in the FTP Connections table.
-
Under the Actions column, click Disconnect to terminate the session.
-
The system will immediately terminate the FTP process associated with that connection.
- To confirm the termination, click Reload to verify that the session is disconnected.
Best Practices for FTP Security
-
Use Secure FTP (SFTP): Whenever possible, use SFTP instead of standard FTP for encrypted file transfers.
-
Restrict FTP Access: Limit FTP access to specific IP addresses if possible.
-
Regularly Monitor FTP Sessions: Frequently check the FTP Connections topic to ensure that only authorized users are accessing your site.
-
Change FTP Passwords Periodically: Update FTP passwords regularly to prevent unauthorized access.
The FTP Connections tool in cPanel is a crucial feature for monitoring active FTP sessions and securing your website. By regularly checking FTP activity and terminating suspicious connections, users can enhance their site’s security and prevent unauthorized file access.
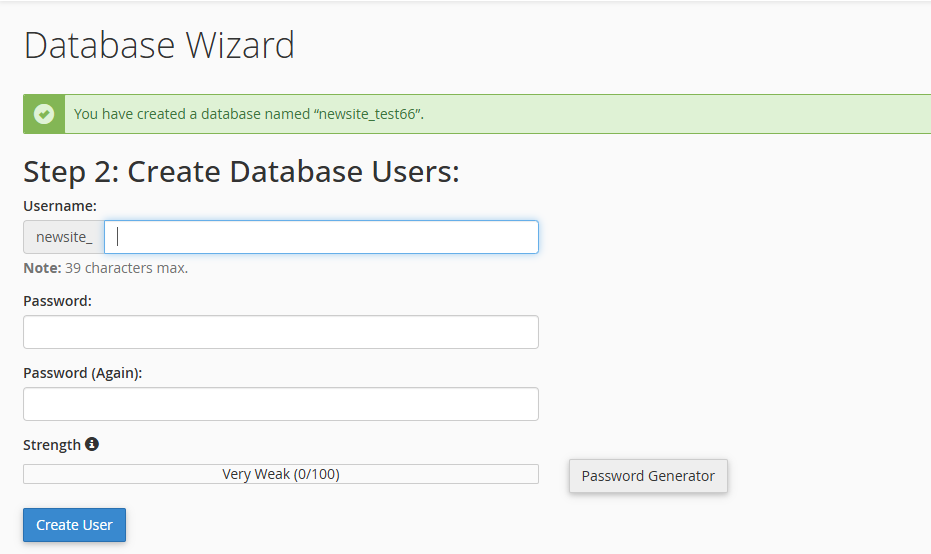
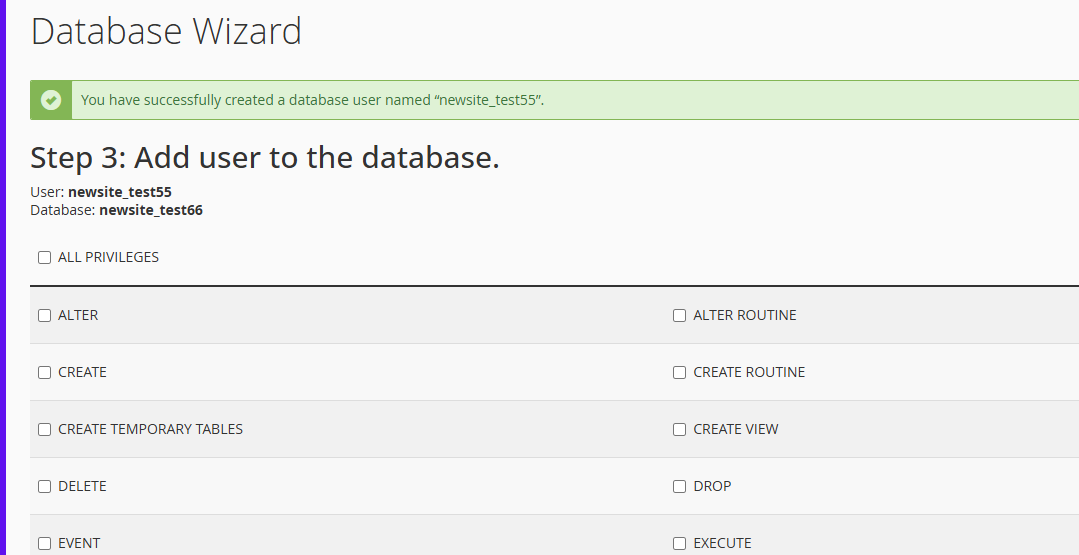
About Databases
cPanel provides powerful database management tools that allow users to create, manage, and maintain databases with ease. The two primary tools available for managing databases are phpMyAdmin and the Database Wizard. These tools are essential for users who need to interact with databases, whether it’s for a web application, content management system, or any other system that relies on databases to store information.
1. phpMyAdmin in cPanel
To access phpMyAdmin:

What Happens After Selecting phpMyAdmin
Once you click on phpMyAdmin, it will open a new window where you can manage your databases. phpMyAdmin is a powerful web-based tool for managing MySQL databases. It provides a user-friendly interface to interact with your databases, allowing you to perform a variety of actions such as:
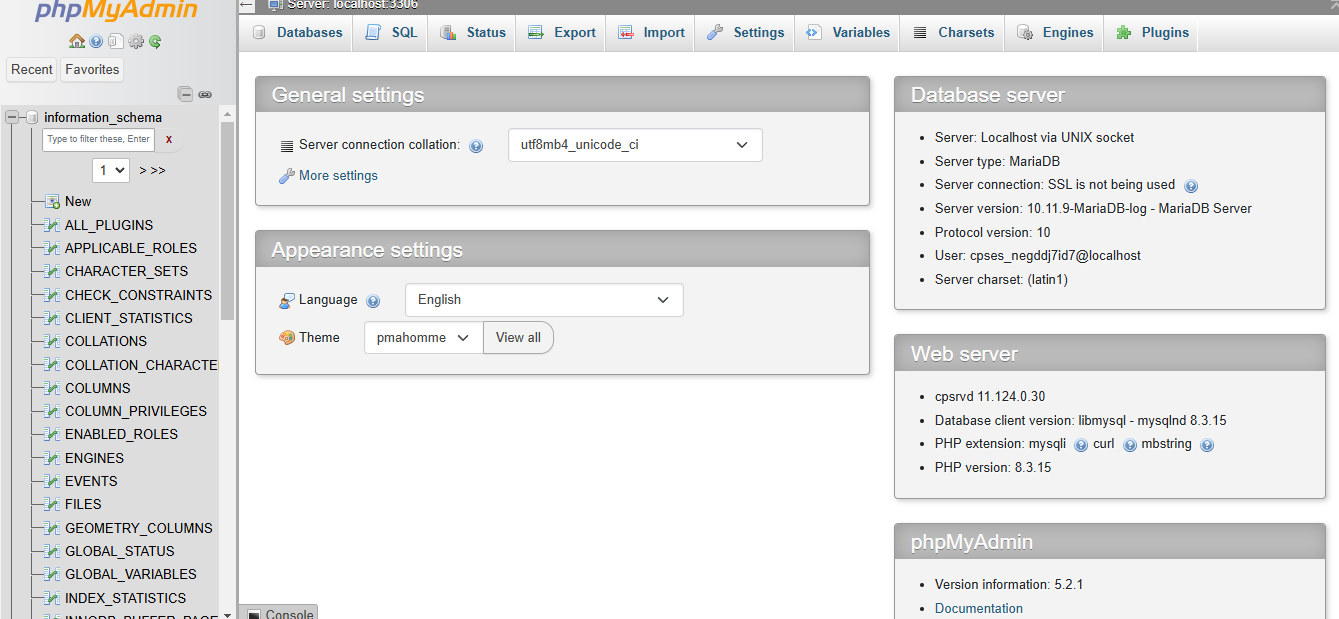
Key Features of phpMyAdmin:
By using phpMyAdmin, you can perform complex database management tasks in a simplified manner through the cPanel interface.
2. Database Wizard in cPanel
The Database Wizard in cPanel is an easy-to-use tool designed to help users create and manage databases without needing extensive technical knowledge. It provides a step-by-step process to create databases and assign user privileges. This feature is especially useful for users who are not familiar with SQL and want a straightforward approach to managing databases.
Accessing the Database Wizard
To access the Database Wizard:
Steps for Using the Database Wizard
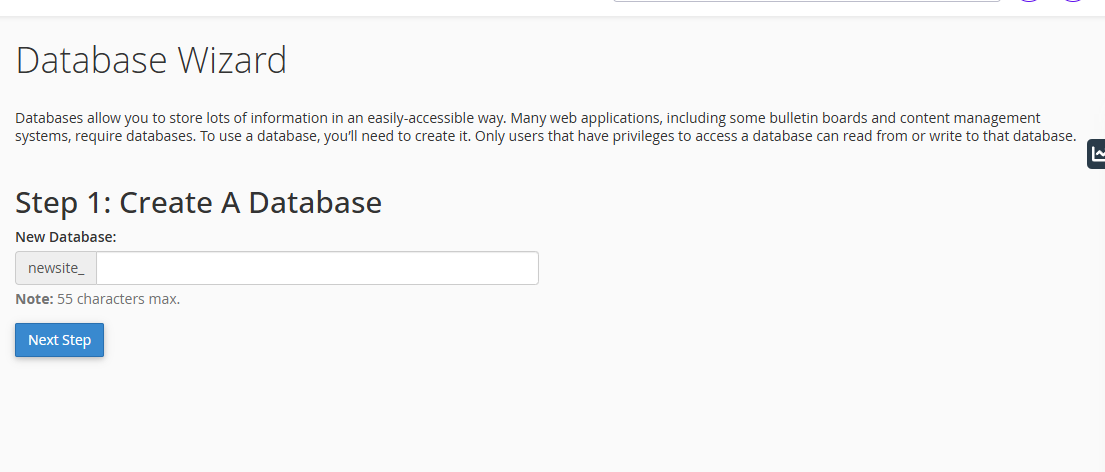
Best Practices When Using the Database Wizard:
The Database Wizard is a convenient tool for users who need to create and manage databases quickly and easily. Whether you’re setting up a database for a web application or managing user permissions, the wizard simplifies the process and ensures that your databases are configured properly.
By using phpMyAdmin and the Database Wizard, you can efficiently manage your databases and ensure your web applications and websites are running smoothly.
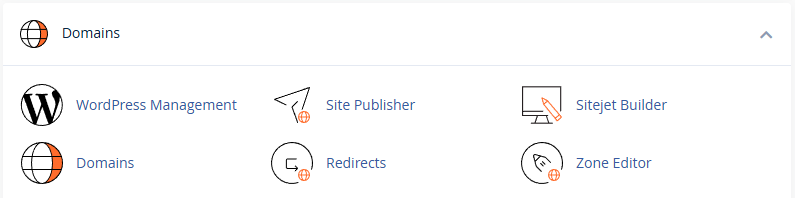
About Domains
cPanel offers several domain management tools to help efficiently manage clients' websites. These tools allow to create websites using templates, build sites with a drag-and-drop builder, and manage domains. This documentation will walk you through each of these tools and how to use them effectively.
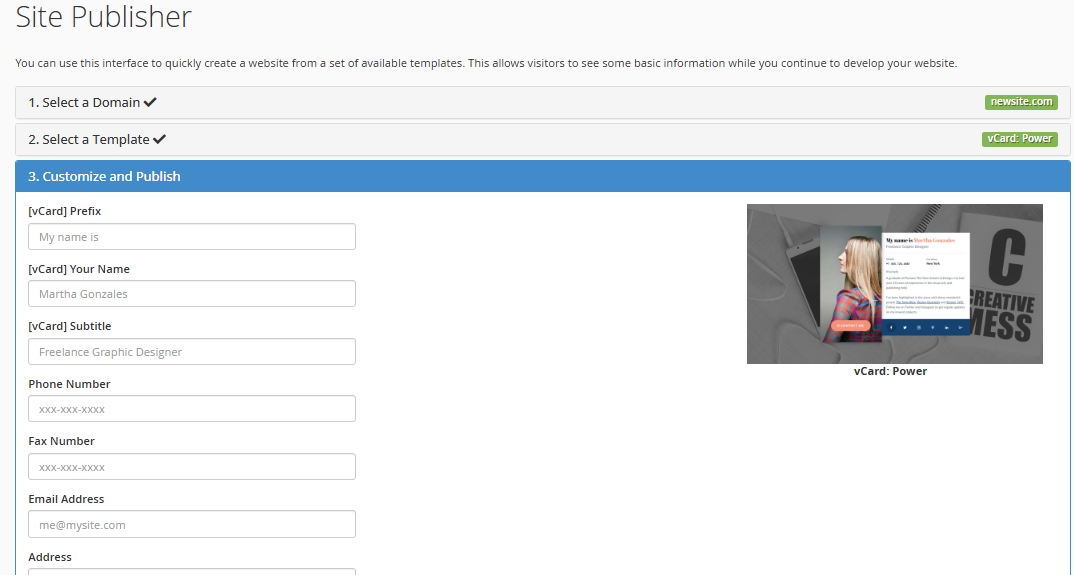
1. Site Publisher Tool
The Site Publisher tool is an easy-to-use feature that allows quick create a website using pre-designed templates. It is an ideal solution for clients who need a basic website while they continue to develop their site.
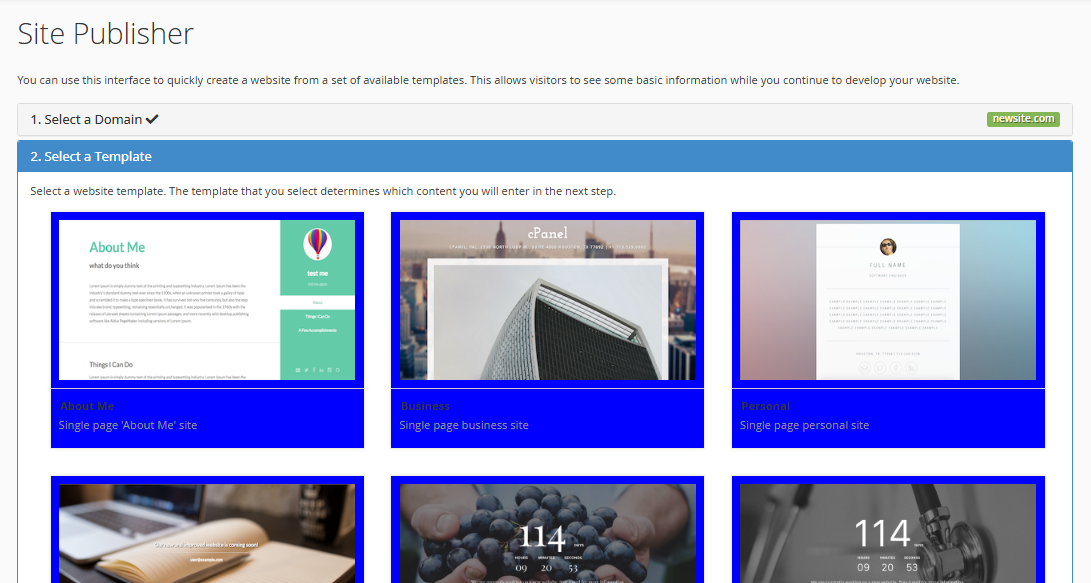
Using the Site Publisher
-
Select a Template: After entering the domain name, you can choose a pre-designed template that will form the basis of the website.
- The templates are categorized by type, including business, personal, and portfolio sites.
-
Customize the Site: After selecting the template, you can customize various sections, including:
- Business Name: Enter your company’s name.
- Tag Line: Enter a catchy tagline for your business.
- Description: Add a description of your company.
- About Us: Add information about your business, such as history and services.
- Contact Information: Enter your contact details such as:
- Street Address
- Phone Number
- Email Address
- Fax Number
- Business Hours: Specify your operating hours and any notes (e.g., weekends closed).
- Social Media Links: Link to your business’s social media accounts, such as Facebook, Twitter, and LinkedIn.
- Google Maps: Include a Google Maps link to show your physical location.
- Google Analytics: Add a Google Analytics Tracker ID to monitor website traffic.
-
Publish the Site: Once the customization is complete, click Publish to make the website live. The website will be automatically created with the selected template and details.

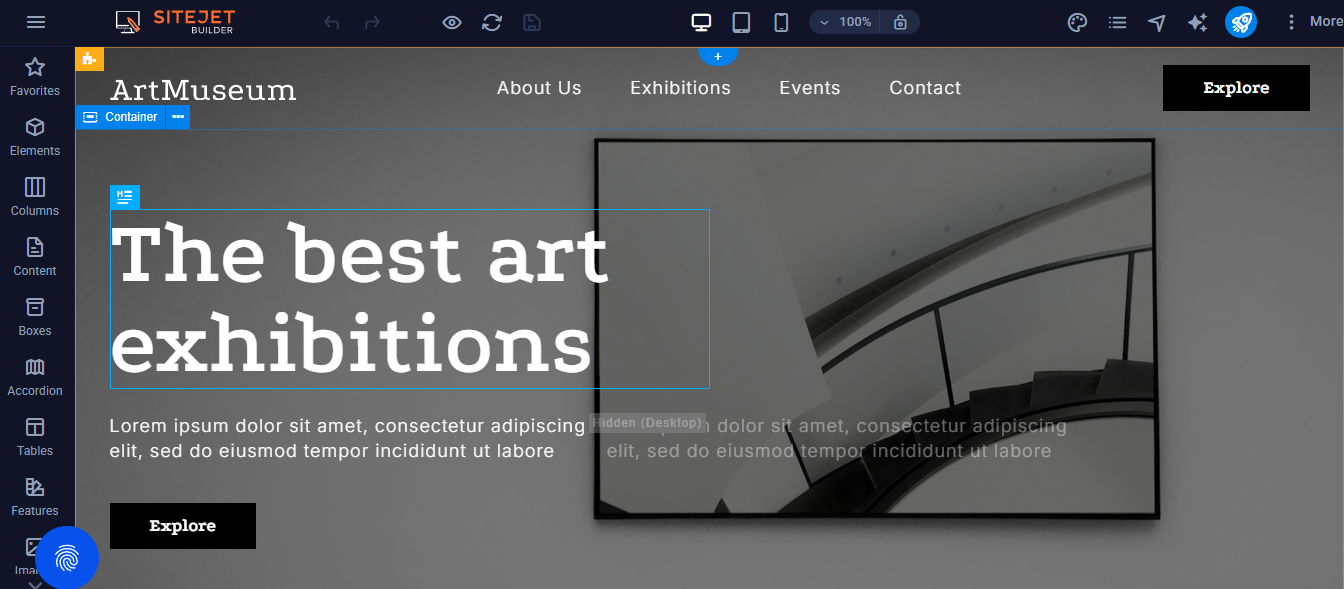
2. Sitejet Builder
The Sitejet Builder is a drag-and-drop website builder that allows creating fully customized websites for clients. With Sitejet, users can quickly edit and build websites using templates, which can be tailored to meet specific client needs.
Using the Sitejet Builder
- Select a Template: Click Edit Site, and you will be redirected to a selection of website templates. You can choose a template that suits the client’s needs.


- Edit the Template: The builder allows you to drag and drop elements to customize the layout and design. You can:
- Add sections like headers, footers, image galleries, and text blocks.
- Modify colors, fonts, and styles.
- Insert contact forms, maps, and social media icons.
- Customize Content: You can easily add, edit, or remove content within the template, ensuring that the website is unique to the client’s business or personal needs.
- Publish the Site: Once the site is ready, press the Publish button to go live. Sitejet makes it easy to launch a custom website without needing to code.


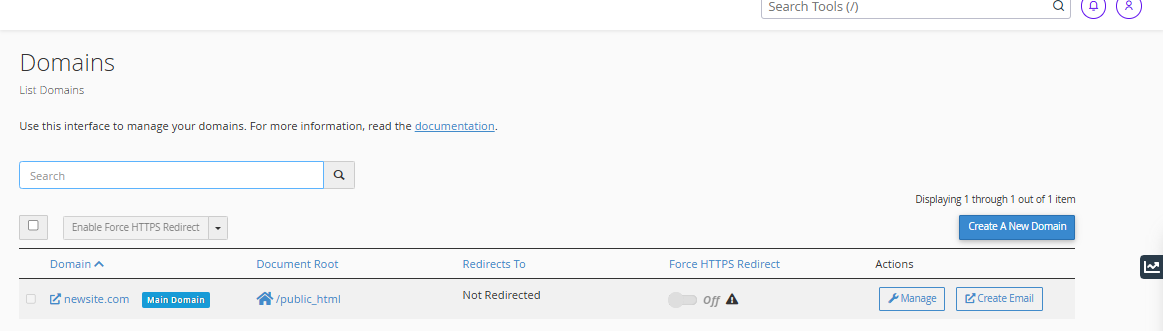
3. Domains Tool
The Domains tool in cPanel allows users to manage domain names, including creating new domains, setting up redirects, and configuring HTTPS redirects.
Managing Domains
The Domains interface displays a list of all domains, including the following details:
- Domain: The domain name associated with the hosting account.
- Document Root: The directory where the domain’s files are stored.
- Redirect To: The destination URL where the domain will redirect, if applicable.
- Force HTTPS Redirect: Whether the domain forces an HTTPS redirect for secure connections.
- Actions: Options to manage or remove domains.

Adding a New Domain
To create a new domain:
- Click on the Create a New Domain button.
- Enter the domain name you want to create.
- Submit the form, and the new domain will be added to the list.

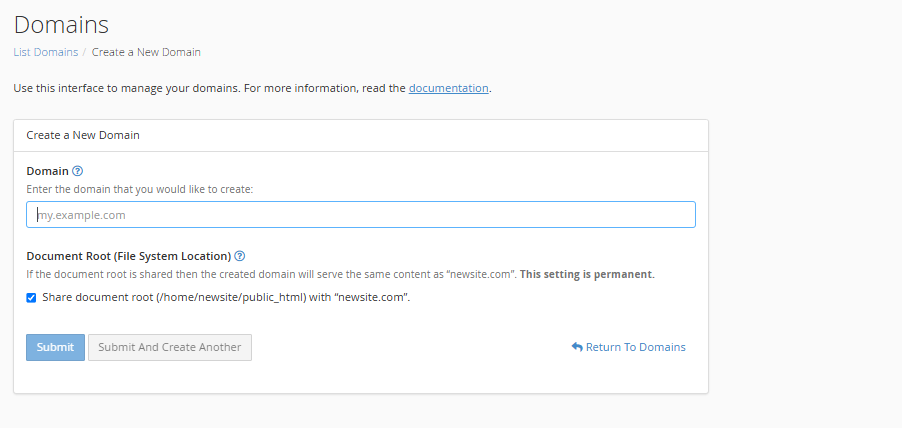
Once the domain is created, it will appear in the domain list. From there, you can manage DNS settings, configure redirects, and more.
About WP ToolKit
cPanel offers several domain management tools to help efficiently manage clients' websites. These tools allow to create websites using templates, build sites with a drag-and-drop builder, and manage domains. This documentation will highlight the WordPress management tool and how to use it.
1. WordPress Management Tool
The WordPress Management feature in cPanel offers a comprehensive toolkit for managing WordPress sites. This feature helps install WordPress, manage plugins and themes, and monitor site quality. It is divided into three main sections: Installations, Plugins, and Themes.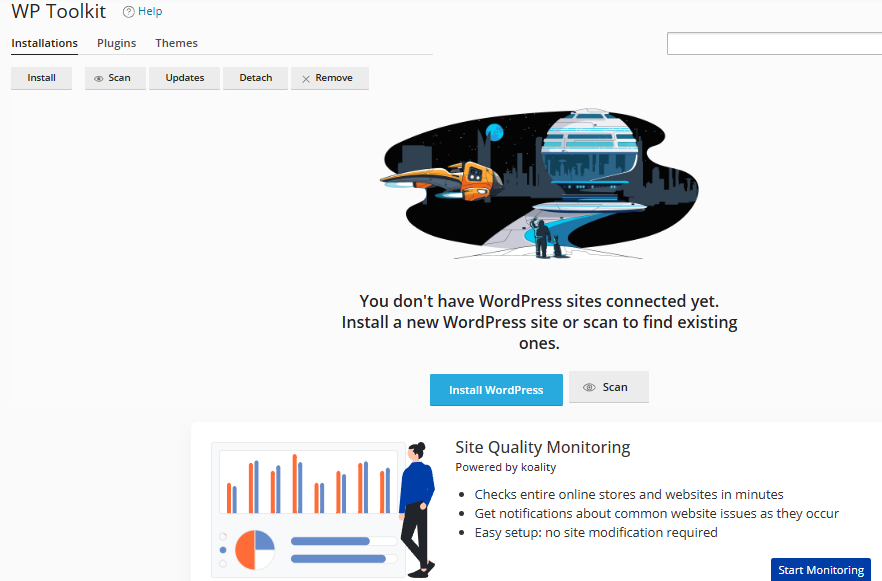
Installations
The Installations section provides a user-friendly interface for managing WordPress sites. Here’s what you can do:
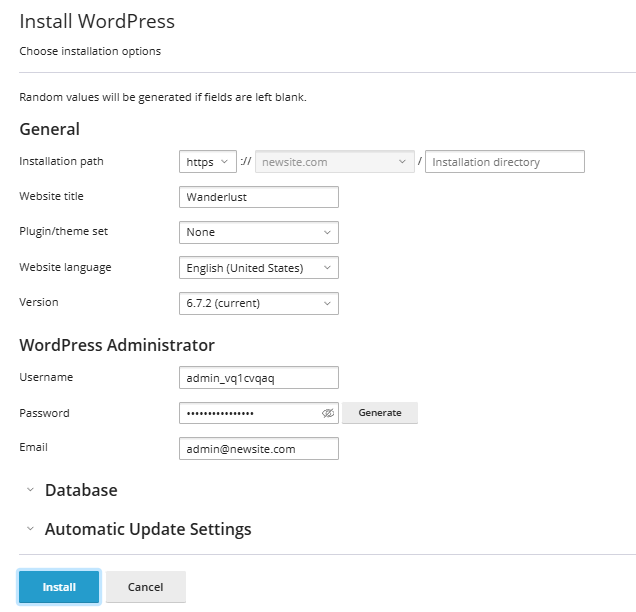
- Install New WordPress: You can install a fresh WordPress site with a few clicks.
- Scan Existing WordPress Installations: If there’s an existing WordPress site, you can scan it and connect it to the WordPress Toolkit for easier management.
- Quality Monitoring: This feature helps you track the health of WordPress websites, including online stores. You’ll get notifications about common website issues such as slow performance, missing plugins, or outdated themes.
- Easy Setup: No need for modifications to the site, it checks for issues automatically.
- Real-Time Notifications: Get instant alerts on any website issues as they occur.

Plugins
In the Plugins section, you can manage the plugins installed on the WordPress sites you manage. Here’s what you can do:
- View Installed Plugins: See a list of all the plugins installed on your WordPress sites.
- Manage Plugins: Activate, deactivate, or update plugins as necessary to keep your WordPress sites running smoothly.
- Install New Plugins: You can also add new plugins to enhance the functionality of WordPress sites.
Themes
The Themes section lets you manage the themes installed on your WordPress installations. Here’s what you can do:
- View Installed Themes: See a list of all the themes installed on your WordPress websites.
- Activate Themes: Choose a theme and set it as active on the site.
- Manage Themes: Enable, disable, or delete themes that are not needed.
- Install New Themes: Add new themes from the WordPress repository or upload custom themes.
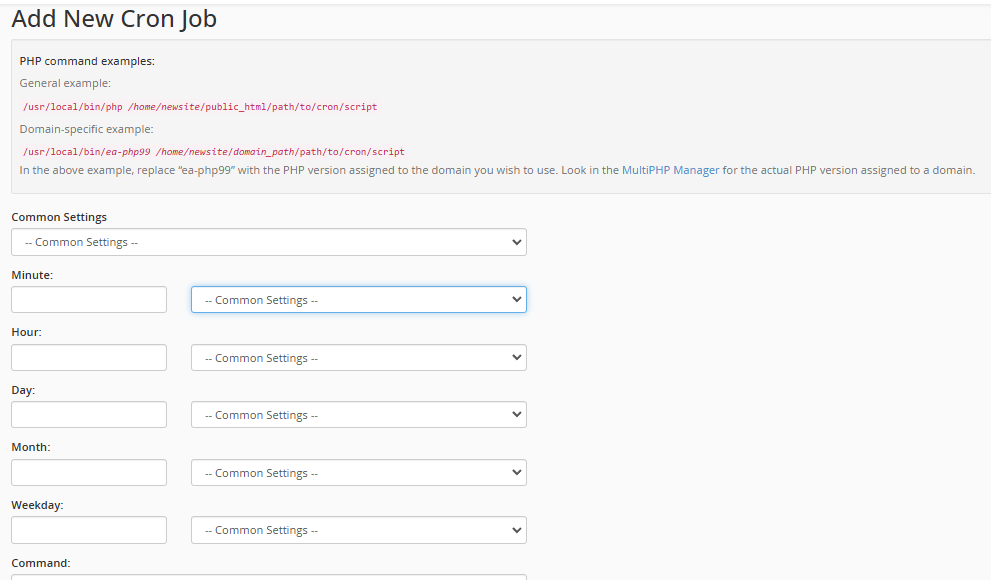
About Cron jobs
Cron jobs in cPanel allow you to automate tasks and execute commands or scripts on your website at scheduled intervals. This can be useful for a variety of administrative tasks, such as clearing temporary files, sending regular reports, or executing database backups. The cron job feature helps you automate processes without manual intervention, ensuring that tasks run on time.
1. Accessing Cron Jobs
To access the Cron Jobs feature:
- Log in to your cPanel account.
- Navigate to the Advanced section.
- Click on Cron Jobs.

This will open the Cron Jobs interface where you can set up, manage, and monitor automated tasks for your site.
Understanding Cron Jobs
Cron jobs are scheduled tasks that run automatically at specified intervals. You can define the frequency and the exact time when these tasks should be executed. Cron jobs are typically used for running commands, executing scripts, or performing server maintenance tasks at specific times.
How Cron Jobs Work
Cron jobs are scheduled by defining time intervals using five fields:
- Minute: The minute when the job should run (0-59).
- Hour: The hour when the job should run (0-23).
- Day: The day of the month when the job should run (1-31).
- Month: The month when the job should run (1-12).
- Weekday: The day of the week when the job should run (0-7) where both 0 and 7 represent Sunday.
For example, if you want a script to run at 2:00 AM every day, you would enter:
- Minute: 0
- Hour: 2
- Day: *
- Month: *
- Weekday: *
Common Settings for Cron Jobs
-
Once per day: If you want to schedule a job to run daily at a specific time, enter the following settings:
- Minute: 0
- Hour: (the hour you want)
- Day: *
- Month: *
- Weekday: *
-
Hourly Cron Job: If you want the task to run every hour, set:
- Minute: 0
- Hour: *
- Day: *
- Month: *
- Weekday: *
-
Weekly Cron Job: If you want the task to run on a specific day of the week (e.g., every Monday at 3:00 AM):
- Minute: 0
- Hour: 3
- Day: *
- Month: *
- Weekday: 1 (for Monday)
2. Adding a New Cron Job
To add a new cron job, follow these steps:
-
Email Settings:
- If you want an email sent to you every time the cron job runs, enter your email address in the Current Email section. For example, you may see newsite@example.com in this field.
- If you don’t want to receive emails, use the command
>/dev/null 2>&1to suppress email notifications. For example:/usr/local/bin/php /home/newsite/public_html/path/to/cron/script >/dev/null 2>&1
-
Set the Time Intervals:
- Use the dropdown menus for Minute, Hour, Day, Month, and Weekday to specify when the cron job should run.

- Use the dropdown menus for Minute, Hour, Day, Month, and Weekday to specify when the cron job should run.
-
Command:
- In the Command field, you’ll enter the command or script that you want to run. Below are some common examples:
General PHP Command:
This will run a PHP script located at
/home/newsite/public_html/path/to/cron/script.Domain-Specific PHP Command:
In this example, replace
ea-php99with the PHP version assigned to the domain. To find the PHP version assigned to the domain, you can check in the MultiPHP Manager in cPanel. -
Add the Cron Job: Once you have configured the cron job settings, click Add New Cron Job to schedule the task.
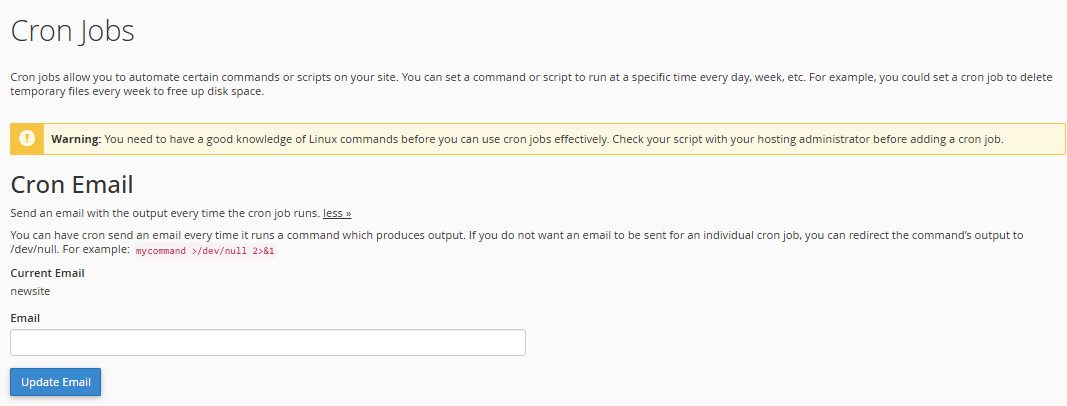
Cron Job Email Notifications
-
Cron Email: When you set up a cron job, you can choose to receive an email each time the cron job runs and produces output. This is useful for monitoring the task’s execution.
- If you don’t need an email notification for a specific cron job, you can redirect its output to
/dev/nullto suppress the email notification. Example:
- If you don’t need an email notification for a specific cron job, you can redirect its output to
-
Current Email: The system will send an email to the email address listed in the Current Email section of your cPanel. You can change the email address if needed.
3. Managing Cron Jobs
Once you have set up cron jobs, they will appear in the Current Cron Jobs table. 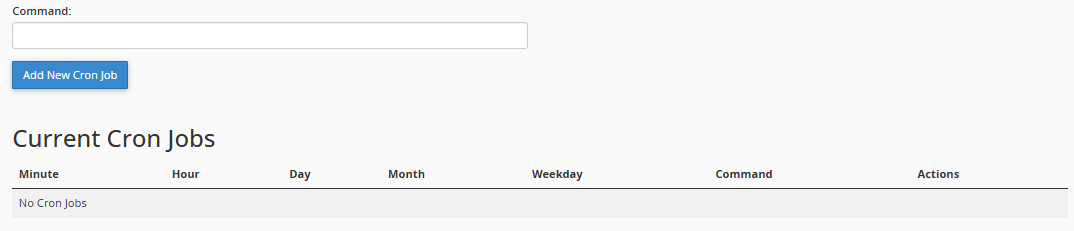
This table displays the following information:
| Minute | Hour | Day | Month | Weekday | Command | Actions |
|---|---|---|---|---|---|---|
| * | 2 | * | * | * | /usr/local/bin/php /home/newsite/public_html/path/to/cron/script | [Edit] [Delete] |
- Actions: You can Edit or Delete an existing cron job by clicking the corresponding link in the Actions column. Editing allows you to adjust the time intervals or the command to be executed.
Important Notes About Cron Jobs
-
Linux Knowledge Required: To use cron jobs effectively, you need to have a basic understanding of Linux commands. Always ensure that the script or command you are scheduling is correct and tested.
-
Testing Scripts: Before adding a cron job, you should test the script to make sure it performs as expected when run manually. This helps avoid errors when the job runs automatically.
-
Cron Job Limits: Some hosting providers may limit the number of cron jobs you can set up or impose restrictions on the frequency at which they can run. Be sure to check with your hosting provider for any limitations.
Cron jobs are an invaluable tool for automating tasks on your website. By setting up cron jobs, you can ensure that tasks like cleaning temporary files, backing up databases, and running scripts happen automatically and on schedule. Always verify your commands and test scripts before scheduling them, and be mindful of your email notifications to keep track of your cron job activities.