cPanel provides powerful database management tools that allow users to create, manage, and maintain databases with ease. The two primary tools available for managing databases are phpMyAdmin and the Database Wizard. These tools are essential for users who need to interact with databases, whether it’s for a web application, content management system, or any other system that relies on databases to store information.
1. phpMyAdmin in cPanel
To access phpMyAdmin:
- Log in to your cPanel account.
- Navigate to the Databases section.
- Click on phpMyAdmin.

What Happens After Selecting phpMyAdmin
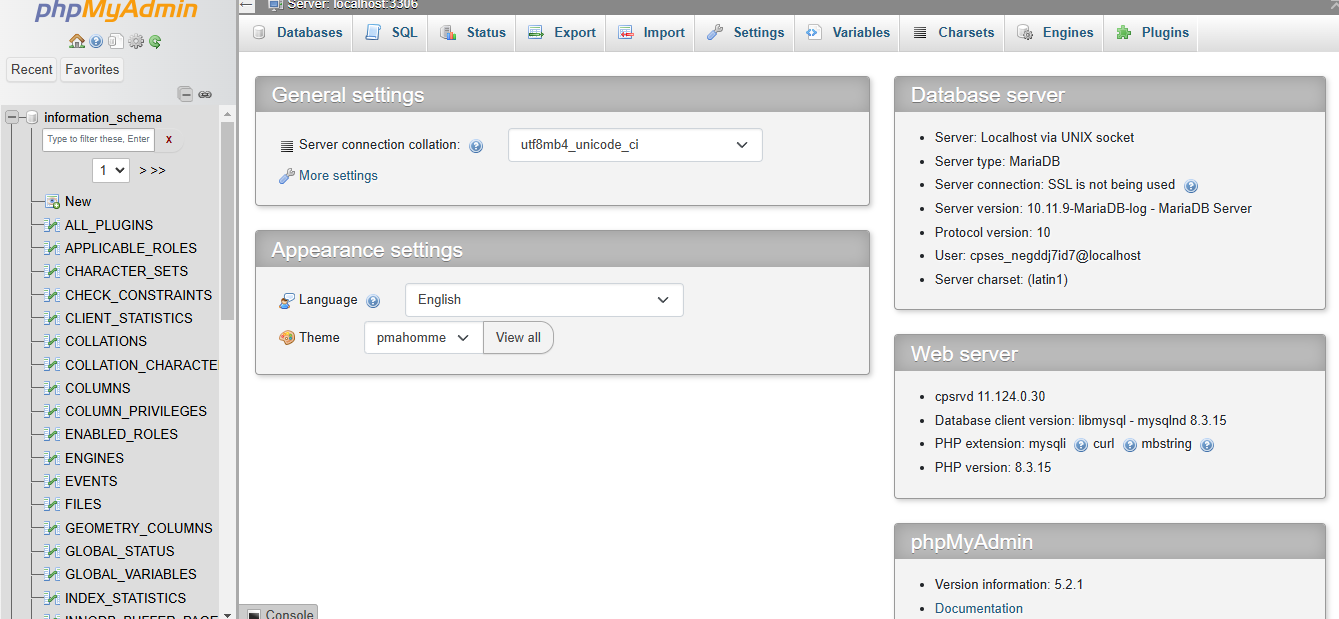
Once you click on phpMyAdmin, it will open a new window where you can manage your databases. phpMyAdmin is a powerful web-based tool for managing MySQL databases. It provides a user-friendly interface to interact with your databases, allowing you to perform a variety of actions such as:
- Creating Databases: You can create new databases for your applications and websites.
- Managing Tables: phpMyAdmin allows you to create, modify, and delete tables within a database.
- Running SQL Queries: You can execute SQL commands to modify or retrieve data.
- Import and Export Data: You can import/export databases in formats like SQL, CSV, and more.
- Managing Users: phpMyAdmin allows you to assign permissions and manage user privileges for accessing databases.

Key Features of phpMyAdmin:
- Browse and Edit Data: You can easily browse and edit data in your tables using a visual interface.
- Search Data: Search your database tables for specific records.
- Database Structure: View and modify the structure of your database, including tables, columns, and indexes.
- Backup and Restore: phpMyAdmin allows you to back up and restore entire databases or individual tables.
By using phpMyAdmin, you can perform complex database management tasks in a simplified manner through the cPanel interface.
2. Database Wizard in cPanel
The Database Wizard in cPanel is an easy-to-use tool designed to help users create and manage databases without needing extensive technical knowledge. It provides a step-by-step process to create databases and assign user privileges. This feature is especially useful for users who are not familiar with SQL and want a straightforward approach to managing databases.
Accessing the Database Wizard
To access the Database Wizard:
- Log in to cPanel.
- Navigate to the Databases section.
- Click on Database Wizard.

Steps for Using the Database Wizard
-
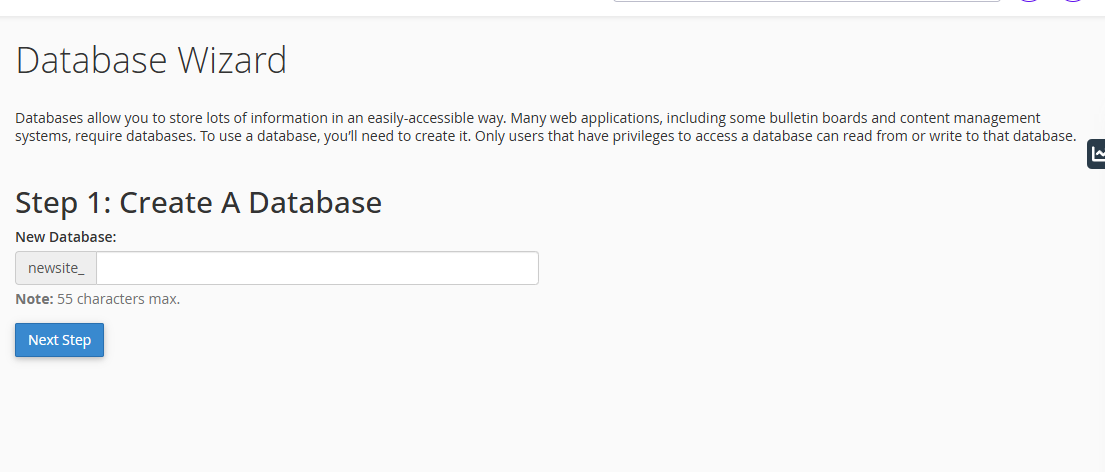
Step 1: Create the Database
- The first step is to create a new database. The wizard will prompt you to enter a name for the database.
- You will need to choose a unique name that is easy to identify, especially if you plan to use multiple databases for different web applications.
- Once the name is entered, click Create Database. The system will automatically create the database and display a success message.

-
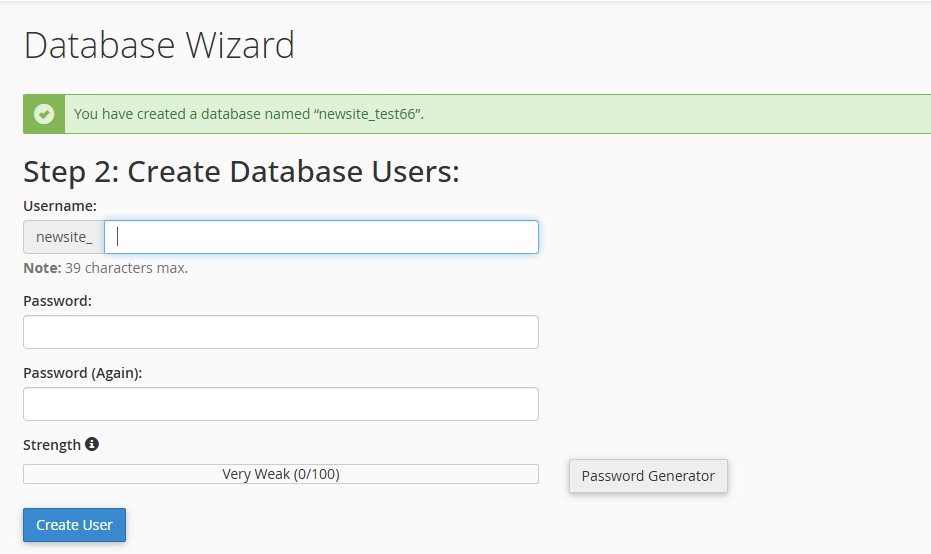
Step 2: Create Database Users
- After creating the database, the wizard will ask you to create a new database user.
- Enter the Username: Choose a unique username for the database user. It’s recommended to create a username that’s easy to associate with the database you are creating.
- Set a Password: You can manually create a password for the user or use the Password Generator provided by cPanel for a stronger, more secure password.
- If you choose to generate a password, make sure to keep it secure and store it in a safe location.
- Once you have entered the username and password, click Create User. The system will create the user and display a confirmation message.

-
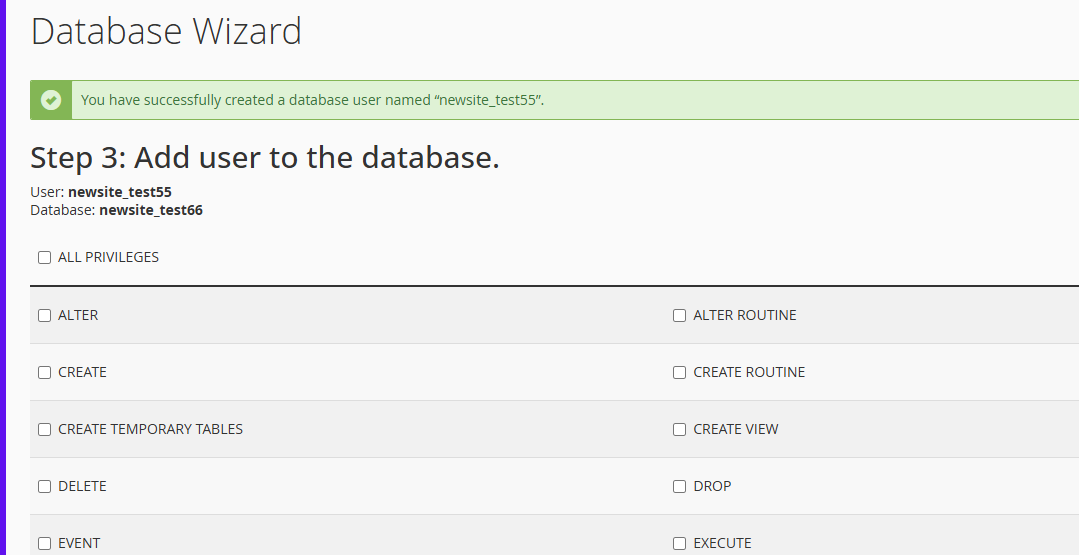
Step 3: Add User to Database
- After creating the database and the user, the final step is to assign privileges to the user for the newly created database.
- Select the Database: Choose the database that the user will have access to.
- Select the User: Choose the user you created in step 2.
- Set Privileges: Assign privileges to the user by checking the boxes next to the specific permissions you want to grant. These privileges determine what the user can do with the database (e.g., read, write, delete, etc.).
- All Privileges: Grants the user full control over the database.
- Specific Privileges: Choose specific permissions like SELECT, INSERT, UPDATE, and more, based on the user’s role and needs.
- Once the privileges are set, click Make Changes to apply the changes.

Best Practices When Using the Database Wizard:
- Security: Always use a strong, unique password for database users to prevent unauthorized access. Consider using the password generator tool for better security.
- User Privileges: Only grant the necessary privileges to each user. For example, if the user only needs to read data, don’t grant write or delete permissions.
- Regular Backups: Always back up your databases before making any major changes. This ensures that you can restore your data if something goes wrong.
The Database Wizard is a convenient tool for users who need to create and manage databases quickly and easily. Whether you’re setting up a database for a web application or managing user permissions, the wizard simplifies the process and ensures that your databases are configured properly.
By using phpMyAdmin and the Database Wizard, you can efficiently manage your databases and ensure your web applications and websites are running smoothly.


