
AI Voice Agent (24/7 Smart Receptionist)
he AI Voice Agent is a professional-grade virtual receptionist that ensures your business never misses a lead. This guide covers how to activate the service as a reseller and how to configure the agent for maximum efficiency.
Part 1: Reseller Activation (Provisioning the Service)
Before your client can use the tool, you must activate it within the Resell Portal.
-
Marketplace: Log in to www.resellportal.com, go to the Marketplace, and select the AI Voice Agent from the Business AI Suite.
-
Assign Client: Choose an existing client or add a new one.
-
Billing Cycle: Select your preferred billing term (Monthly, Quarterly, etc.).
-
Activate: Ensure your wallet has sufficient funds and click Add Service to Client.
-
Onboarding: Your client will receive an automated email with their dashboard login credentials.
Part 2: How the Voice Agent Works (Customer View)
The Voice Agent is an AI-powered system designed to handle inquiries, schedule meetings, and qualify leads.
The Ideal Workflow: Use our Smart Widget on your website. During business hours, the widget displays your live office number. After hours, it automatically switches to show the AI Number. This ensures that while your staff is away, the AI picks up the phone to handle inquiries instantly.
Part 3: Initial Setup & Configuration
1. Choosing Your Permanent Number
When you first open the tool, you will be prompted to choose a phone number.
-
Search by Area Code: Find a local number that fits your business location.
-
⚠️ Important: This number is permanent and cannot be changed or deleted once selected. It will serve as the gateway for your AI Agent.
2. Customizing Your Agent
Click Edit Configuration to define your agent’s personality and knowledge:
-
Basic Info: Set the Business/Agent Name and a custom Welcome Message (e.g., "Hello! You've reached Sunburst Auto Sales, how can I help you today?").
-
Voice Type: Choose a voice persona (Male/Female) that matches your brand tone.
-
-
-
Knowledge Base: Enter your website URL and click Scan. The AI will crawl your site to learn your services, inventory, and FAQs.
-
-
-
-
Custom Knowledge: You can manually add or edit information to ensure the AI has the most up-to-date details not found on your website.
3. Setting Notification Preferences
-
Callback Number: Set a mobile number to receive alerts when a caller requests to speak to a human.
-
Alert Toggles: Choose to be notified via email for every new call, scheduled appointment, or callback request.
Part 4: The 4 Agent Modes
You can set a specific goal for your agent depending on your business needs:
-
📅 Scheduler: The agent’s primary goal is to book appointments. It interacts with the caller to find a preferred date/time, sends an email request to you, and provides a confirmation email to the caller.
-
📋 Collector: The agent focuses on gathering lead data (Name, Email, Phone, and specific project details). This information is sent to you immediately via email.
-
ℹ️ Informer: Ideal for general Q&A. The agent uses your scanned website content to answer frequently asked questions about your hours, location, and services.
-
🎯 Qualifier: The agent asks targeted questions to determine if a caller is a "hot lead" based on your criteria. You receive the qualification results via email.
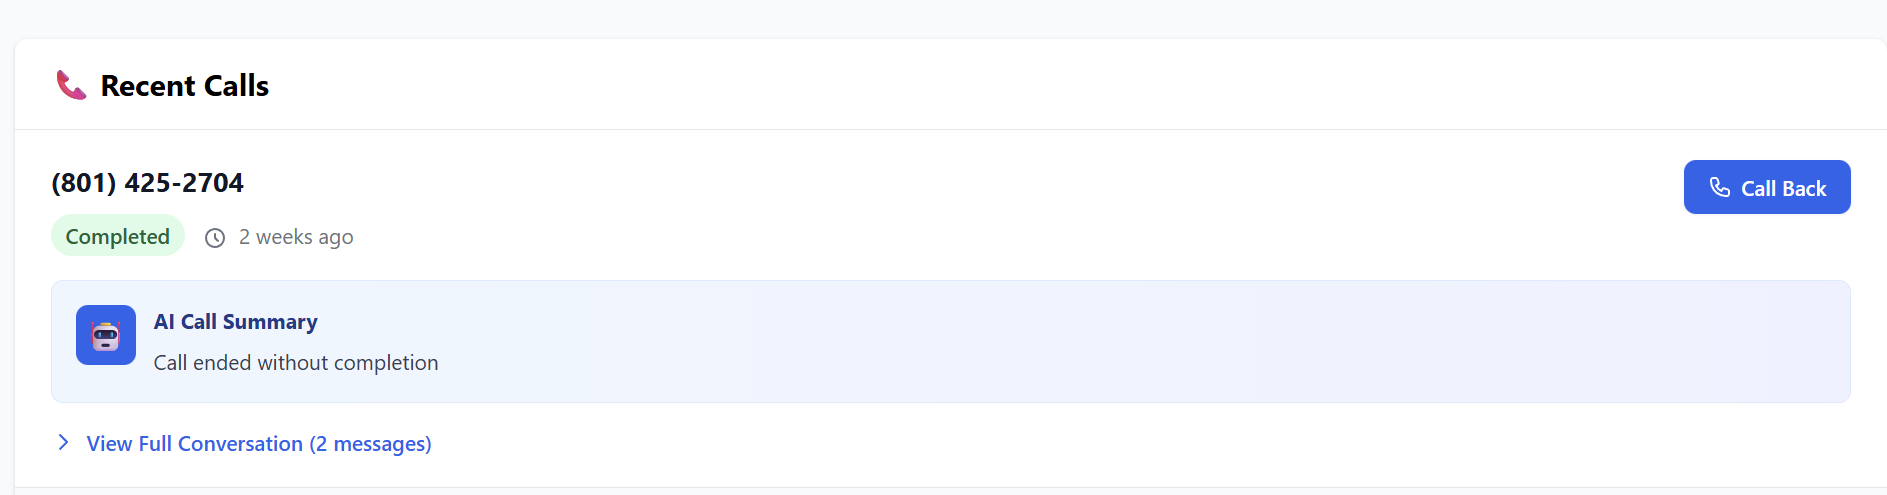
Part 5: Viewing Call Logs & Transcripts
You can monitor all AI interactions under the Recent Calls section on the main page:
-
AI Summary: A quick bulleted summary of what the call was about.
-
Full Transcript: A word-for-word text record of the conversation.
-
-
Caller Details: View the caller's number and the specific outcome (e.g., "Appointment Scheduled").
-
-

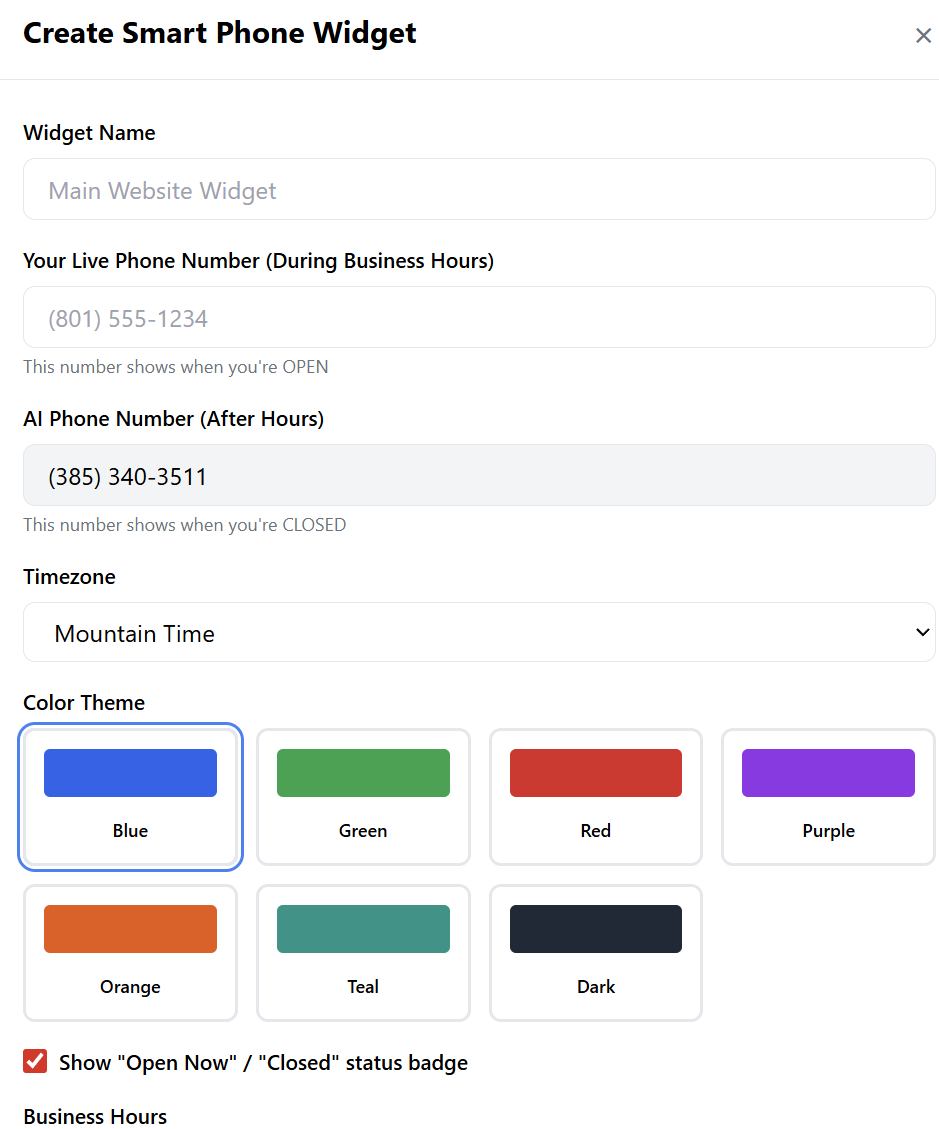
Part 6: Creating the Website Widget
To implement the "Number Switcher" on your website:
-
Create Widget: Click the "Create Widget" button.

-
Configuration:
-
Enter the Live Number (for business hours).
-
The AI Number is auto-filled from your account.
-
Set your Business Hours and Timezone.
-
Select a Color Theme to match your website design.

-
-
Deployment: Click Create Widget, then click Copy Code. Paste this HTML snippet into your website's footer or header.

The widget will now automatically toggle between your live staff and your AI Agent based on the time of day.
Summary for Resellers:
The AI Voice Agent is a "sticky" service with high retention. By helping your clients set up their Knowledge Base and Widget, you provide them with a 24/7 sales force that never takes a day off.